Showing posts with label painting. Show all posts

Wednesday, June 8, 2011

An Artful Home

I love having art in the home and Jeff and I have quite the collection going. We've been lucky to have been gifted with some great pieces and found some lovely ones ourselves. When considering a new piece we usually go through a checklist of sorts:
- Do we like it? Why do we like it? It's more than just thinking something is pretty. Prettiness comes and goes, but if it actually makes us feel something then it's worth a second look.
- Where are we going to put it? Though this one isn't a dealbreaker we do like to have a plan in mind for where our new piece will eventually end up.
- Does it fit with the rest of the house? I'm not trying to make our entire house match (that would be cuckoo) it's more about keeping it all in the same theme - which is currently bright, fun and a little funky.

Not too long ago I revealed our master bedroom, but we weren't quite done. There was no art! It took us a little while to find the right mix of pieces. We wanted them to work with the room, but not be too matchy matchy.

First came our DIY monogrammed pictures above the headboard.

These were super simple to do. I just typed our initials and 'and' into a word document, messed around until I found some fonts we liked and then printed them. We popped them into IKEA frames and voila - instant personalized art.
[The fonts are Graf Circulum (J), Handstand (and) and Chopin (S)}
In December Jeff and I went to the One of a Kind show and we were just about to give up on finding anything we wanted to take home when we found an amazing Japanese artist who still does traditional marbling. The artist, Robert Wu, was so nice and super helpful in helping us find the perfect prints which now hang over our little reading nook.

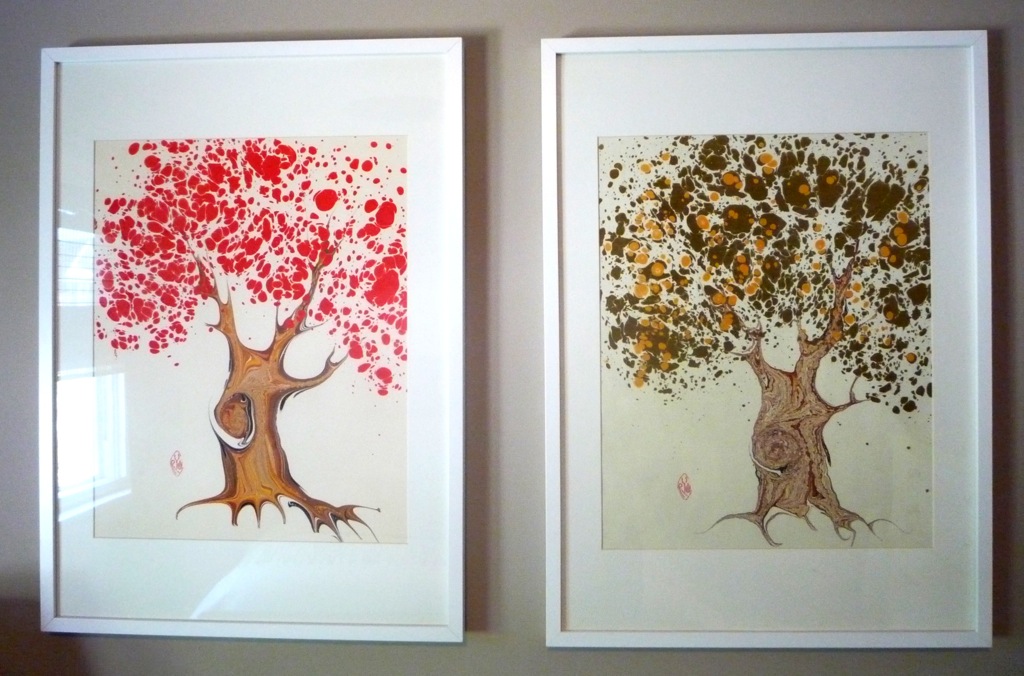
Marbling is done one sheet at a time, so each one is unique - which I love.

Lastly, our 'gallery wall' above the dresser. Part of being art junkies is that sometimes we have more pieces than we know what to do with. This system lets us move around our current collection and add/subtract pieces when we get bored of them.

Our current collection consists of some pretty special pieces...
1. A photograph taken by Jeff's late grandfather who was an amazing photographer.
2. A painting by my bestfriend and former roommate, Carrie.
3. A photograph from our engagement shoot. Taken by the amazing Angela Y Martin.
4. Our kitty cat, Kuro.
5. Buddha. He's been with me since I moved to Toronto. This is our 4th home together.
6. I collect elephants (as well as art). This little wooden guy is from our recent trip to Dominican Republic.
7. This elephant is one of the first gifts Jeff ever bought me. He's from a little shop in Niagara on the Lake that we picked up our first summer together.
8. All our wedding mementos fit in this cute little wooden box (our invites, menu, my veil and wedding jewelry).
9. Cute converse sneakers print was a bonus from JohnWGolden's Etsy shop where we got our robot prints from (yay for freebies).

I think adding art can really personalize a home, and that's all what we're about!

Monday, June 6, 2011

Naked Shed

When we first toured the house last Auguest we noticed a lack of storage and because we have a lot of junk stuff personal items we knew we'd have to fix that. We moved in late October and didn't have a lot of time to get to work before the real cold set in. We didn't have the time to plan, design and build our own shed so we ordered a 'shed kit' from Shedman. Jeff visited their Pickering location where he got to check out all their different styles and get a sense for the quality of the workmanship. He was happy and because it was the end of the season we got a smoking deal on one of their 'barn style' sheds. What they basically delivered was a pile of wood (all cut to length), screws, roofing shingles and the directions (which we promptly discarded). We figured it ended up costing us less than if we had bought everything piecemeal from a hardware store AND it was delivered right into our backyard. Score!

First we had to remove the rotting planter at the very back of the yard. When we tore it apart it was a treasure trove of discarded junk; pieces of concrete, rocks, a 2' length of pipe, random childrens toys, a ballon and other random bits of garbage. It was like the previous owner had chosen to use his planter as a garbage instead of a place for pretty flowers.

Sometimes Jeff likes to tackle major projects by himself. After all, he's a man and can do anything. But when it came to building our new shed he called in reinforcements. On a bitter cold Sunday in November my dad, father-in-law and sister's boyfriend all came up to lend a hand (I ordered pizza and kept the cat company inside). After many hot cups of coffee and a 24 slice pizza we had this monstrous thing of beauty...
{That shed is perfectly level. It's our entire lawn that's on a slope}
Excitedly we went out and bought 2 gallons of paint to pretty this girl up. And then the temperatures dropped and it was too cold to actually get any paint on her. We thought about giving it a shot and crossing our fingers but apparently if you paint when it's too cold out it doesn't stick well and it could bubble off. Which would be gross and counter productive. So we waited. All winter. And our shed was naked.

Then it got nice again and we got off our butts and dug out the cans of paint that had been sitting unused all winter and got to work. ***sidenote: When I say 'we' I mean 'Jeff' - this was all his baby.
{One coat of 'Elephant Skin' and she doesn't look too pretty)
Halfway through we ran out of paint (because that's how we do things around here). It took 2 whole weekends but she was finally done.

It only took us 7 months from start to finish, but I think it was worth the wait. Not only is the shed super pretty, but also HUGE (8'x10'x10') and solves so many of our storage problems. Jeff has already installed a loft for added vertical storage, he's built a workbench and currently working on an organization system for everything. Once he's done I'll post pictures but for now I am sworn to secrecy.

I love looking back on where we started and seeing how far we've come. The backyard (and frontyard) are in need of some major rehabilitation which we plan to spread over the next few summers, at least now we have a place to start those projects and store all the necessary stuffs needed to make it happen.
{Click to enlarge}

Thursday, May 26, 2011

Basement 1/2 Bath: The Reveal

Despite how crazy frustrating it was to paint the stripes in our basement bathroom (check out that saga here), I am totally thrilled with the results. We managed to turn a boring, basic bathroom into a chic and sophisticated powder room without spending a ton of cash.

Because this is the basement bathroom with no windows I wanted it to be bright and warm (not dark and dank). Orange and yellow seemed to be a naturally cheerful combination and the gray added a touch of style.

Just because this is a bathroom doesn't mean it has to have typical bathroom art (florals or seashells).We went with a couple unique and quirky pieces for visual interest.

Before + After
There you have it, classy style on a budget!

Cost Breakdown:
  • white paint - free! (old owner left it behind)
  • Chinchilla White (gray) paint - $5 tester pot
  • orange hand towel and facecloth - $10 (on clearance from HomeSense)
  • large painting - $40 (on sale from local decor store)
  • lightbulb print - $11 (from Etsy shop Rococco Co)
  • frame - $8 (from Value Village)
  • toilet paper dispenser and garbage can - $30 (from Home Outfitters)
  • soap and lotion - free! (christmas gift from the in-laws)
  • TOTAL: $104 (for a completely new look!)

Wednesday, May 18, 2011

Why I'll Never Paint Stripes Again...

I suppose this post could also be called "How I spent All Weekend Crying into a Bucket of Paint".

It was no secret to us that the dude who lived in the house before us was no Mr Fix-It, he's probably closer to Mr Cover-It-Up-So-No One-Will-See-The-Mess-I-Made (but that's too long to say). The small basement 1/2 bath was begging for a little personality so we decided to go stripey, which wouldn't have been a problem if any of the walls in this place were true. And I'm not talking just a little bit off, these walls and ceiling and floors are insanely crooked. It's like the guys who finished the basement just eyeballed everything. Sigh.

Here's a quick recap of what we saw when we toured the house for the first time...


I used plain old white paint that the old owner had left behind and a tester pot from another room (more on that to come). The white was the lighter colour (duh) so I roughed in where I wanted the lighter stripes. At this point everything was going smoothly and I was pretty confident this would be a quick job. I was wrong.

The crookedness of the walls isn't immediately obvious when everything is the same frickin beige colour, but once I started taping it all became apparent.

I first started measuring from the floor, when I got to the ceiling I realized that something was 'off'. So I started using a level, but that didn't help either because when I got to the floor or ceiling it was super obvious how ridiculous the lines were. Then I started sweating and just decided to 'eyeball' it. Yep, I gave in. I decided to initially use my measurements from the ground, then when it started to get obvious that the slope was off I manually corrected it to be 'straighter' (which I guess in this case is a relative term). I got to perfect my 'eyeball' technique on the other 3 walls.

I'm probably just being a perfectionist when it comes to these lines but in the end I am totally happy with the result and will be back shortly to share the complete room. Until then, enjoy these crisp semi-straight, tear-inducing stripes.

 Oops...ran out of painter's tape (my bestfriend and worse enemy in this process)