House numbers are a way to set your house apart from everyone elses and show a little personality at the same time. We wanted something bold, modern and a bit different when it came to the numbers that would identify our house. We've actually had the supplies for this DIY project since about a week after we moved in, but due to every other thing seeming more important we didn't get around to it until this past weekend and I am kicking myself that it took me 6 months to do it because I am beyond thrilled with how it turned out.
We started with a piece of black plexiglass that Jeff snagged from his previous job ($25). It was a bit too big so we used our chop saw to cut it to size.
We got these great mod-ish numbers from Lowe's for $8 each. Do you know how hard it is to find reasonably priced modern items? Hard! At one point we thought we'd have to order something online which would have set us back over $75. Luckily Lowe's had just what we were looking for.
We figured out the placement of the numbers and using the handy drill guide we made our holes for the posts.
Using the holes on the plexi as a guide, we marked on our brick column where we needed to drill and Jeff got to work.
Next we attached the screw posts that came with the numbers and popped them into place on the plexi.
We used construction adhesive to fill the drill holes and smeared a bunch on the back of the plexi for good measure...
That sucker is never coming off now!
I actually jumped up and down in the driveway and did a little happy dance when the numbers were finally on. They are exactly what I was hoping for - totally custom house numbers for around $40.
Showing posts with label outside. Show all posts
Monday, July 11, 2011
Monday, July 4, 2011
Grey is the New White
We loved the way the colours on our shed turned out, so when we decided it was time to give our house a facelift we stuck to the same colour palette (Behr's Elephant Skin and Painter's White to those interested).
This is what we had to work with - sickly green siding on top, stock white on the bottom, rickety stairs and peeling paint. We've already fixed the ugly insulbrick on the side with crisp white siding, but we still had a lot of work ahead of us.
We spent all long weekend working and this is where we're at...
Done:
- window casing painted white
- steps repaired (yay for not breaking an ankle!)
- removed old house numbers
- spraypainted mailbox and lights
- painted walls and columns
To Do:
- make new house numbers
- paint floor
- paint front door
- paint green siding white
The green siding really ruins the whole look for me so I prefer to use this view instead...
I love the way it's starting to take on a more modern feel (which we are big fans of) and I have big ideas for the rest of our To Do list to keep it heading in the modern direction, but first I need a nap and a cold beer. Here's a couple inspiration pictures to keep you interested.
This is what we had to work with - sickly green siding on top, stock white on the bottom, rickety stairs and peeling paint. We've already fixed the ugly insulbrick on the side with crisp white siding, but we still had a lot of work ahead of us.
We spent all long weekend working and this is where we're at...
Done:
- window casing painted white
- steps repaired (yay for not breaking an ankle!)
- removed old house numbers
- spraypainted mailbox and lights
- painted walls and columns
To Do:
- make new house numbers
- paint floor
- paint front door
- paint green siding white
The green siding really ruins the whole look for me so I prefer to use this view instead...
I love the way it's starting to take on a more modern feel (which we are big fans of) and I have big ideas for the rest of our To Do list to keep it heading in the modern direction, but first I need a nap and a cold beer. Here's a couple inspiration pictures to keep you interested.
![]() |
| {from Design for Mankind} |
![]() |
| {from Not Cot} |
![]() |
| {Rug from Urban Outfitters [no longer available], picture from Black. White. Yellow.} |
Monday, June 6, 2011
Naked Shed
When we first toured the house last Auguest we noticed a lack of storage and because we have a lot of junk stuff personal items we knew we'd have to fix that. We moved in late October and didn't have a lot of time to get to work before the real cold set in. We didn't have the time to plan, design and build our own shed so we ordered a 'shed kit' from Shedman. Jeff visited their Pickering location where he got to check out all their different styles and get a sense for the quality of the workmanship. He was happy and because it was the end of the season we got a smoking deal on one of their 'barn style' sheds. What they basically delivered was a pile of wood (all cut to length), screws, roofing shingles and the directions (which we promptly discarded). We figured it ended up costing us less than if we had bought everything piecemeal from a hardware store AND it was delivered right into our backyard. Score!
First we had to remove the rotting planter at the very back of the yard. When we tore it apart it was a treasure trove of discarded junk; pieces of concrete, rocks, a 2' length of pipe, random childrens toys, a ballon and other random bits of garbage. It was like the previous owner had chosen to use his planter as a garbage instead of a place for pretty flowers.
Sometimes Jeff likes to tackle major projects by himself. After all, he's a man and can do anything. But when it came to building our new shed he called in reinforcements. On a bitter cold Sunday in November my dad, father-in-law and sister's boyfriend all came up to lend a hand (I ordered pizza and kept the cat company inside). After many hot cups of coffee and a 24 slice pizza we had this monstrous thing of beauty...
Excitedly we went out and bought 2 gallons of paint to pretty this girl up. And then the temperatures dropped and it was too cold to actually get any paint on her. We thought about giving it a shot and crossing our fingers but apparently if you paint when it's too cold out it doesn't stick well and it could bubble off. Which would be gross and counter productive. So we waited. All winter. And our shed was naked.
Then it got nice again and we got off our butts and dug out the cans of paint that had been sitting unused all winter and got to work. ***sidenote: When I say 'we' I mean 'Jeff' - this was all his baby.
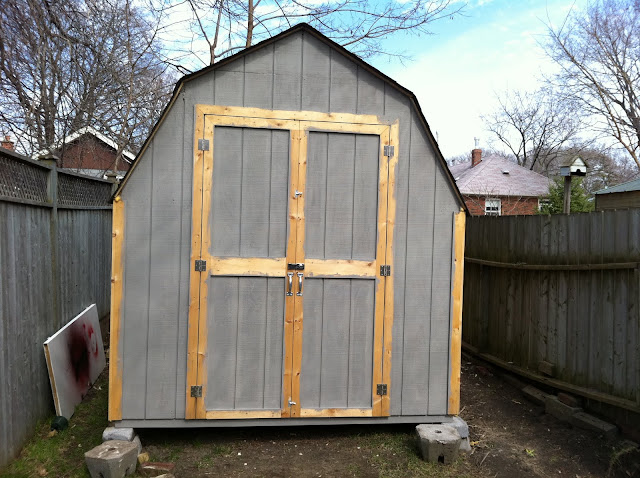
Halfway through we ran out of paint (because that's how we do things around here). It took 2 whole weekends but she was finally done.
It only took us 7 months from start to finish, but I think it was worth the wait. Not only is the shed super pretty, but also HUGE (8'x10'x10') and solves so many of our storage problems. Jeff has already installed a loft for added vertical storage, he's built a workbench and currently working on an organization system for everything. Once he's done I'll post pictures but for now I am sworn to secrecy.
I love looking back on where we started and seeing how far we've come. The backyard (and frontyard) are in need of some major rehabilitation which we plan to spread over the next few summers, at least now we have a place to start those projects and store all the necessary stuffs needed to make it happen.
First we had to remove the rotting planter at the very back of the yard. When we tore it apart it was a treasure trove of discarded junk; pieces of concrete, rocks, a 2' length of pipe, random childrens toys, a ballon and other random bits of garbage. It was like the previous owner had chosen to use his planter as a garbage instead of a place for pretty flowers.
Sometimes Jeff likes to tackle major projects by himself. After all, he's a man and can do anything. But when it came to building our new shed he called in reinforcements. On a bitter cold Sunday in November my dad, father-in-law and sister's boyfriend all came up to lend a hand (I ordered pizza and kept the cat company inside). After many hot cups of coffee and a 24 slice pizza we had this monstrous thing of beauty...
| {That shed is perfectly level. It's our entire lawn that's on a slope} |
Then it got nice again and we got off our butts and dug out the cans of paint that had been sitting unused all winter and got to work. ***sidenote: When I say 'we' I mean 'Jeff' - this was all his baby.
| {One coat of 'Elephant Skin' and she doesn't look too pretty) |
It only took us 7 months from start to finish, but I think it was worth the wait. Not only is the shed super pretty, but also HUGE (8'x10'x10') and solves so many of our storage problems. Jeff has already installed a loft for added vertical storage, he's built a workbench and currently working on an organization system for everything. Once he's done I'll post pictures but for now I am sworn to secrecy.
I love looking back on where we started and seeing how far we've come. The backyard (and frontyard) are in need of some major rehabilitation which we plan to spread over the next few summers, at least now we have a place to start those projects and store all the necessary stuffs needed to make it happen.
![]() |
| {Click to enlarge} |
Subscribe to:
Posts (Atom)


